| Naam |
Venus |
Venus |
Callisto |
Nyx |
| OS |
SuSE 10.3 64 bit |
SuSE 10.3 64 bit |
openSuSE 11.1 32
bit |
CentOS 5.2 64bit |
| Monitoring Software |
xymon 4.23 (staat aan per 07-03-2009) |
Hobbit 4.20 (staat niet meer aan) | xymon 4.23 / devmon |
xymon 4.23RC1 |
| http://home.gejanssen.com/xymon/ |
http://home.gejanssen.com/hobbit/ |
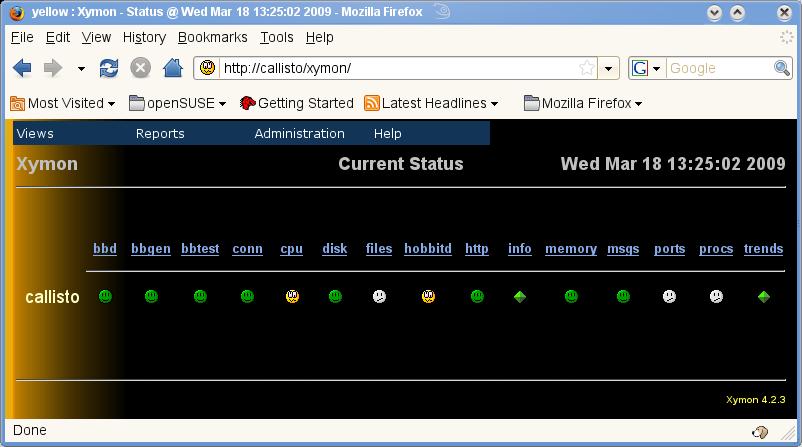
http://callisto/xymon/ |
http://nyx/xymon/ |
| [root@nyx ~]# yum update base 100% |=========================| 1.1 kB 00:00 primary.xml.gz 100% |=========================| 1.1 MB 00:02 .... Installed: kernel.x86_64 0:2.6.18-92.1.22.el5 Dependency Installed: yum-fastestmirror.noarch 0:1.1.10-9.el5.centos Updated: bind-libs.x86_64 30:9.3.4-6.0.3.P1.el5_2 bind-utils.x86_64 30:9.3.4-6.0.3.P1.el5_2 bluez-libs.x86_64 0:3.7-1.1 bluez-utils.x86_64 0:3.7-2.2.el5.centos bzip2.x86_64 0:1.0.3-4.el5_2 bzip2-libs.x86_64 0:1.0.3-4.el5_2 cups.x86_64 1:1.2.4-11.18.el5_2.3 cups-libs.x86_64 1:1.2.4-11.18.el5_2.3 dbus.x86_64 0:1.0.0-7.el5_2.1 dhcpv6-client.x86_64 0:1.0.10-4.el5_2.3 dmraid.x86_64 0:1.0.0.rc13-15.el5_2.1 ed.x86_64 0:0.2-39.el5_2 freetype.x86_64 0:2.2.1-20.el5_2 glibc.x86_64 0:2.5-24.el5_2.2 glibc.i686 0:2.5-24.el5_2.2 glibc-common.x86_64 0:2.5-24.el5_2.2 gnutls.x86_64 0:1.4.1-3.el5_2.1 initscripts.x86_64 0:8.45.19.1.EL-1.el5.centos ipsec-tools.x86_64 0:0.6.5-9.el5_2.3 krb5-libs.x86_64 0:1.6.1-25.el5_2.2 krb5-libs.i386 0:1.6.1-25.el5_2.2 krb5-workstation.x86_64 0:1.6.1-25.el5_2.2 libtiff.x86_64 0:3.8.2-7.el5_2.2 libxml2.x86_64 0:2.6.26-2.1.2.7 libxml2-python.x86_64 0:2.6.26-2.1.2.7 lvm2.x86_64 0:2.02.32-4.el5_2.1 nfs-utils.x86_64 1:1.0.9-35z.el5_2 nscd.x86_64 0:2.5-24.el5_2.2 nspr.i386 0:4.7.3-2.el5 nspr.x86_64 0:4.7.3-2.el5 nss.x86_64 0:3.12.2.0-4.el5.centos nss.i386 0:3.12.2.0-4.el5.centos nss-tools.x86_64 0:3.12.2.0-4.el5.centos nss_ldap.i386 0:253-13.el5_2.1 nss_ldap.x86_64 0:253-13.el5_2.1 openldap.x86_64 0:2.3.27-8.el5_2.4 openldap.i386 0:2.3.27-8.el5_2.4 openssh.x86_64 0:4.3p2-26.el5_2.1 openssh-clients.x86_64 0:4.3p2-26.el5_2.1 openssh-server.x86_64 0:4.3p2-26.el5_2.1 openssl.i686 0:0.9.8b-10.el5_2.1 openssl.x86_64 0:0.9.8b-10.el5_2.1 pam_krb5.x86_64 0:2.2.14-1.el5_2.1 pam_krb5.i386 0:2.2.14-1.el5_2.1 paps.x86_64 0:0.6.6-18.el5 perl.x86_64 4:5.8.8-15.el5_2.1 selinux-policy.noarch 0:2.4.6-137.1.el5 selinux-policy-targeted.noarch 0:2.4.6-137.1.el5 sos.noarch 0:1.7-9.2.el5_2.2 tzdata.noarch 0:2008i-1.el5 vim-common.x86_64 2:7.0.109-4.el5_2.4z vim-enhanced.x86_64 2:7.0.109-4.el5_2.4z vim-minimal.x86_64 2:7.0.109-4.el5_2.4z yum.noarch 0:3.2.8-9.el5.centos.2.1 Complete! [root@nyx ~]# |
| [root@nyx ~]# yum install gcc-c++ perl lynx ntp
kernel-dev mrtg pcre-devel openssl-devel openldap-devel httpd Loading "fastestmirror" plugin Determining fastest mirrors * base: ftp.nluug.nl ... Installing: openssl-devel ####################### [29/29] Installed: gcc-c++.x86_64 0:4.1.2-42.el5 lynx.x86_64 0:2.8.5-28.1.el5_2.1 mrtg.x86_64 0:2.14.5-2 ntp.x86_64 0:4.2.2p1-8.el5.centos.1 openssl-devel.x86_64 0:0.9.8b-10.el5_2.1 openssl-devel.i386 0:0.9.8b-10.el5_2.1 pcre-devel.i386 0:6.6-2.el5_1.7 pcre-devel.x86_64 0:6.6-2.el5_1.7 Dependency Installed: cpp.x86_64 0:4.1.2-42.el5 e2fsprogs-devel.x86_64 0:1.39-15.el5 gcc.x86_64 0:4.1.2-42.el5 gd.x86_64 0:2.0.33-9.4.el5_1.1 gdbm.i386 0:1.8.0-26.2.1 glibc-devel.x86_64 0:2.5-24.el5_2.2 glibc-headers.x86_64 0:2.5-24.el5_2.2 kernel-headers.x86_64 0:2.6.18-92.1.22.el5 keyutils-libs-devel.x86_64 0:1.2-1.el5 krb5-devel.x86_64 0:1.6.1-25.el5_2.2 libXpm.x86_64 0:3.5.5-3 libgomp.x86_64 0:4.1.2-42.el5 libselinux-devel.x86_64 0:1.33.4-5.el5 libsepol-devel.x86_64 0:1.15.2-1.el5 libstdc++-devel.x86_64 0:4.1.2-42.el5 pcre.i386 0:6.6-2.el5_1.7 perl.i386 4:5.8.8-15.el5_2.1 perl-IO-Socket-INET6.noarch 0:2.51-2.fc6 perl-Socket6.x86_64 0:0.19-3.fc6 pkgconfig.x86_64 1:0.21-2.el5 zlib-devel.x86_64 0:1.2.3-3 Complete! [root@nyx ~]# Repository toevoegen door /etc/yum.repos.d/dag.repo aan te maken met de volgende info. [root@nyx yum.repos.d]# cat dag.repo [dag] name=Dag RPM Repository for Red Hat Enterprise Linux baseurl=http://apt.sw.be/redhat/el$releasever/en/$basearch/dag gpgcheck=1 gpgkey=http://dag.wieers.com/rpm/packages/RPM-GPG-KEY.dag.txt enabled=1 [root@nyx yum.repos.d]# install rrdtool-devel [root@nyx yum.repos.d]# yum install rrdtool-devel Loading "fastestmirror" plugin Loading mirror speeds from cached hostfile * dag: apt.sw.be * extras: mirror.atrpms.net ..... Installing: rrdtool-devel ######################### [1/1] Installed: rrdtool-devel.x86_64 0:1.2.29-1.el5.rf Complete! |
| [root@nyx xymon-4.2.3-RC1]# useradd -m xymon |
| root@nyx ~]# wget
http://surfnet.dl.sourceforge.net/sourceforge/hobbitmon/xymon-4.2.3-RC1.tar.gz --12:58:55-- http://surfnet.dl.sourceforge.net/sourceforge/hobbitmon/xymon-4.2.3-RC1.tar.gz Resolving surfnet.dl.sourceforge.net... 130.59.138.20, 2001:620:0:1b::20 Connecting to surfnet.dl.sourceforge.net|130.59.138.20|:80... connected. HTTP request sent, awaiting response... 200 OK Length: 2318168 (2.2M) [application/x-tar] Saving to: `xymon-4.2.3-RC1.tar.gz' 100%[=============================>] 2,318,168 532K/s in 4.3s 12:59:00 (532 KB/s) - `xymon-4.2.3-RC1.tar.gz' saved [2318168/2318168] [root@nyx ~]# |
| [root@nyx ~]# cd /usr/src/ [root@nyx src]# tar xvzf /root/xymon-4.2.3-RC1.tar.gz ..... [root@nyx src]# cd xymon-4.2.3-RC1/ |
| [root@nyx xymon-4.2.3-RC1]#
patch -p0 < hobbitd-cookie.patch (Stripping trailing CRs from patch.) patching file hobbitd/hobbitd.c [root@nyx xymon-4.2.3-RC1]# |
[root@nyx xymon-4.2.3-RC1]# ./configure Configuration script for Xymon This script asks a few questions and builds a Makefile to compile Xymon Checking your make-utility Checking pre-requisites for building Xymon Checking for fping ... Hobbit has a built-in ping utility (hobbitping) However, it is not yet fully stable and therefore it may be best to use the external fping utility instead. I could not find fping on your system Do you want to use hobbitping [Y/n] ? OK, I will use hobbitping. Checking for RRDtool ... test-rrd.c: In function ‘main’: test-rrd.c:30: error: too few arguments to function ‘rrd_graph’ make: *** [test-compile] Error 1 Not RRDtool 1.0.x, checking for 1.2.x Found RRDtool include files in /usr/include Found RRDtool libraries in /usr/lib64 Checking for PCRE ... Found PCRE include files in /usr/include Found PCRE libraries in /usr/lib64 Checking for OpenSSL ... Found OpenSSL include files in /usr/include Found OpenSSL libraries in /usr/lib64 Xymon can use the OpenSSL library to test SSL-enabled services like POP3S, IMAPS, NNTPS and TELNETS. If you have the OpenSSL library installed, I recommend that you enable this. Do you want to be able to test SSL-enabled services (y) ? Checking for LDAP ... Found LDAP include files in /usr/include Found LDAP libraries in /usr/lib64 Xymon can use your OpenLDAP LDAP client library to test LDAP servers. Do you want to be able to test LDAP servers (y) ? Enable experimental support for LDAP/SSL (OpenLDAP 2.x only) (y) ? Checking for clock_gettime() requiring librt ... clock_gettime() requires librt Checking for Large File Support ... Large File Support OK Setting up for a Xymon server What userid will be running Xymon [xymon] ? Found passwd entry for user xymon:x:2412:2412::/home/xymon:/bin/bash Where do you want the Xymon installation [/home/xymon] ? /opt/monitor/xymon WARNING: /opt/monitor/xymon does not exist. What URL will you use for the Xymon webpages [/xymon] ? Where to put the Xymon CGI scripts [/opt/monitor/xymon/cgi-bin] ? (Note: This is the filesystem directory - we will get to the URL shortly) What is the URL for the Xymon CGI directory [/xymon-cgi] ? (Note: This is the URL - NOT the filesystem directory) ********************** SECURITY NOTICE **************************** If your Xymon server is accessible by outsiders, then you should restrict access to the CGI scripts that handle enable/disable of hosts, and acknowledging of alerts. The easiest way to do this is to put these in a separate CGI directory and require a password to access them. Even if your Xymon server is on a secured, internal network, you may want to have some operations (like disabling a host) be password- protected - that lets you see who disabled or acknowledged an alert. Where to put the Xymon Administration CGI scripts [/opt/monitor/xymon/cgi-secure] ? (Note: This is the filesystem directory - we will get to the URL shortly) What is the URL for the Xymon Administration CGI directory [/xymon-seccgi] ? (Note: This is the URL - NOT the filesystem directory) ** Note that you may need to modify your webserver configuration. ** After installing, see /opt/monitor/xymon/server/etc/hobbit-apache.conf for an example configuration. To generate Xymon availability reports, your webserver must have write-access to a directory below the Xymon top-level directory. I can set this up if you tell me what group-ID your webserver runs with. This is typically 'nobody' or 'apache' or 'www-data' What group-ID does your webserver use [nobody] ? apache Where to put the Xymon logfiles [/var/log/xymon] ? What is the name of this host [nyx] ? What is the IP-address of this host [127.0.0.1] ? ** NOTE: Using 127.0.0.1 (loopback), but it is probably not what you want ** Where should I install the Xymon man-pages (/usr/local/man) ? Using Linux Makefile settings Created Makefile with the necessary information to build Xymon Some defaults are used, so do look at the Makefile before continuing. Configuration complete - now run make (GNU make) to build the tools [root@nyx xymon-4.2.3-RC1]#make ... [root@nyx xymon-4.2.3-RC1]#make install ... Installation complete. You must configure your webserver for the Hobbit webpages and CGI-scripts. A sample Apache configuration is in /opt/monitor/xymon/server/etc/hobbit-apache.conf If you have your Administration CGI scripts in a separate directory, then you must also setup the password-file with the htpasswd command. To start Hobbit, as the xymon user run '/opt/monitor/xymon/server/bin/hobbit.sh start' To view the Hobbit webpages, go to http://nyx/xymon [root@nyx xymon-4.2.3-RC1]# |
| [root@nyx xymon-4.2.3-RC1]# su -
xymon -c '/opt/monitor/xymon/server/bin/hobbit.sh start' Hobbit started [root@nyx xymon-4.2.3-RC1]# su - xymon -c '/opt/monitor/xymon/client/runclient.sh start' Hobbit client for linux started on nyx [root@nyx xymon-4.2.3-RC1]# |
| [root@nyx xymon-4.2.3-RC1]#
chkconfig --level 2345 httpd on [root@nyx xymon-4.2.3-RC1]# chkconfig --list httpd |
| [root@nyx ~]# chkconfig --add --level 2345 xymon [root@nyx ~]# chkconfig --list xymon xymon 0:off 1:off 2:on 3:on 4:on 5:on 6:off [root@nyx ~]# service xymon start service xymon status service xymon reload |
| callisto:/root # zypper update Loading repository data... Reading installed packages... The following packages are going to be upgraded: aaa_base attr autofs bind-libs bind-utils cifs-mount ConsoleKit curl dbus-1 dbus-1-glib dbus-1-python desktop-translations glibc glibc-locale hal kernel-pae kernel-pae-base kernel-pae-extra libattr libavahi-client3 libavahi-common3 libcurl4 libdns_sd libopenssl0_9_8 libpng12-0 libpython2_6-1_0 libqt4 libqt4-qt3support libqt4-sql libqt4-sql-mysql libqt4-x11 libQtWebKit4 libtalloc1 libtdb1 libtiff3 libwbclient0 libxml2 libzypp Mesa module-init-tools nfs-client nscd ntp openslp openssl openssl-certs parted perl perl-base perl-Bootloader perl-doc PolicyKit python python-base python-satsolver python-xml release-notes-openSUSE satsolver-tools sudo sysvinit util-linux vim vim-base vim-data vmware-kmp-pae yast2 yast2-bootloader yast2-mail yast2-network yast2-online-update yast2-online-update-frontend yast2-pkg-bindings zypper The following NEW package is going to be installed: keyutils Overall download size: 103.7 M. After the operation, additional 3.9 M will be used. Continue? [YES/no]: |
| callisto:/home/gej # zypper install gcc perl apache2
openldap2-devel openldap2 nss-compat-openssl-devel openssl pcre-devel
pcre mrtg rrdtool rrdtool-devel make Loading repository data... Reading installed packages... 'perl' is already installed. 'openssl' is already installed. 'pcre' is already installed. Resolving package dependencies... The following NEW packages are going to be installed: ... Overall download size: 25.0 M. After the operation, additional 94.7 M will be used. Continue? [YES/no]: |
| callisto:~ # wget
http://surfnet.dl.sourceforge.net/sourceforge/hobbitmon/xymon-4.2.3.tar.gz --2009-03-18 12:53:30-- http://surfnet.dl.sourceforge.net/sourceforge/hobbitmon/xymon-4.2.3.tar.gz Resolving surfnet.dl.sourceforge.net... 130.59.138.21, 2001:620:0:1b::21 Connecting to surfnet.dl.sourceforge.net|130.59.138.21|:80... connected. HTTP request sent, awaiting response... 200 OK Length: 2313567 (2.2M) [application/x-gzip] Saving to: `xymon-4.2.3.tar.gz' 100%[=================================================================================================================================================================>] 2,313,567 770K/s in 2.9s 2009-03-18 12:53:33 (770 KB/s) - `xymon-4.2.3.tar.gz' saved [2313567/2313567] callisto:~ #cd /usr/sr |
| [root@nyx ~]# cd /usr/src/ callisto:/usr/src # tar xvzf ~/xymon-4.2.3.tar.gz ... callisto:/usr/src # cd xymon-4.2.3/ callisto:/usr/src/xymon-4.2.3 # |
| callisto:/usr/src/xymon-4.2.3 # useradd -m xymon |
| callisto:/usr/src/xymon-4.2.3 # ./configure
Configuration script for Xymon This script asks a few questions and builds a Makefile to compile Xymon Checking your make-utility Checking pre-requisites for building Xymon Checking for fping ... Hobbit has a built-in ping utility (hobbitping) However, it is not yet fully stable and therefore it may be best to use the external fping utility instead. I could not find fping on your system Do you want to use hobbitping [Y/n] ? OK, I will use hobbitping. Checking for RRDtool ... test-rrd.c: In function ‘main’: test-rrd.c:30: error: too few arguments to function ‘rrd_graph’ make: *** [test-compile] Error 1 Not RRDtool 1.0.x, checking for 1.2.x Found RRDtool include files in /usr/include Found RRDtool libraries in /usr/lib Checking for PCRE ... Found PCRE include files in /usr/include Found PCRE libraries in /usr/lib Checking for OpenSSL ... Found OpenSSL include files in /usr/include Found OpenSSL libraries in /usr/lib Xymon can use the OpenSSL library to test SSL-enabled services like POP3S, IMAPS, NNTPS and TELNETS. If you have the OpenSSL library installed, I recommend that you enable this. Do you want to be able to test SSL-enabled services (y) ? Checking for LDAP ... Found LDAP include files in /usr/include Found LDAP libraries in /usr/lib Xymon can use your OpenLDAP LDAP client library to test LDAP servers. Do you want to be able to test LDAP servers (y) ? Enable experimental support for LDAP/SSL (OpenLDAP 2.x only) (y) ? Checking for clock_gettime() requiring librt ... clock_gettime() requires librt Checking for Large File Support ... Large File Support OK Setting up for a Xymon server What userid will be running Xymon [xymon] ? Found passwd entry for user xymon:x:1001:100::/home/xymon:/bin/bash Where do you want the Xymon installation [/home/xymon] ? /opt/monitor/xymon WARNING: /opt/monitor/xymon does not exist. What URL will you use for the Xymon webpages [/xymon] ? Where to put the Xymon CGI scripts [/opt/monitor/xymon/cgi-bin] ? (Note: This is the filesystem directory - we will get to the URL shortly) What is the URL for the Xymon CGI directory [/xymon-cgi] ? (Note: This is the URL - NOT the filesystem directory) ********************** SECURITY NOTICE **************************** If your Xymon server is accessible by outsiders, then you should restrict access to the CGI scripts that handle enable/disable of hosts, and acknowledging of alerts. The easiest way to do this is to put these in a separate CGI directory and require a password to access them. Even if your Xymon server is on a secured, internal network, you may want to have some operations (like disabling a host) be password- protected - that lets you see who disabled or acknowledged an alert. Where to put the Xymon Administration CGI scripts [/opt/monitor/xymon/cgi-secure] ? (Note: This is the filesystem directory - we will get to the URL shortly) What is the URL for the Xymon Administration CGI directory [/xymon-seccgi] ? (Note: This is the URL - NOT the filesystem directory) ** Note that you may need to modify your webserver configuration. ** After installing, see /opt/monitor/xymon/server/etc/hobbit-apache.conf for an example configuration. To generate Xymon availability reports, your webserver must have write-access to a directory below the Xymon top-level directory. I can set this up if you tell me what group-ID your webserver runs with. This is typically 'nobody' or 'apache' or 'www-data' What group-ID does your webserver use [nobody] ? www Where to put the Xymon logfiles [/var/log/xymon] ? What is the name of this host [callisto] ? What is the IP-address of this host [127.0.0.1] ? ** NOTE: Using 127.0.0.1 (loopback), but it is probably not what you want ** Where should I install the Xymon man-pages (/usr/local/man) ? Using Linux Makefile settings Created Makefile with the necessary information to build Xymon Some defaults are used, so do look at the Makefile before continuing. Configuration complete - now run make (GNU make) to build the tools callisto:/usr/src/xymon-4.2.3 # |
| callisto:/usr/src/xymon-4.2.3 # make ... make[1]: Leaving directory `/usr/src/xymon-4.2.3/client' Build complete. Now run 'make install' as root callisto:/usr/src/xymon-4.2.3 #make install ... make[1]: Leaving directory `/usr/src/xymon-4.2.3/client' Installation complete. You must configure your webserver for the Hobbit webpages and CGI-scripts. A sample Apache configuration is in /opt/monitor/xymon/server/etc/hobbit-apache.conf If you have your Administration CGI scripts in a separate directory, then you must also setup the password-file with the htpasswd command. To start Hobbit, as the xymon user run '/opt/monitor/xymon/server/bin/hobbit.sh start' To view the Hobbit webpages, go to http://callisto/xymon callisto:/usr/src/xymon-4.2.3 # |
| callisto:/opt/monitor/xymon/server/etc
# cp hobbit-apache.conf
/etc/apache2/conf.d/ callisto:/opt/monitor/xymon/server/etc # insserv apache2 callisto:/opt/monitor/xymon/server/etc # service apache2 start Starting httpd2 (prefork) done callisto:/opt/monitor/xymon/server/etc # |
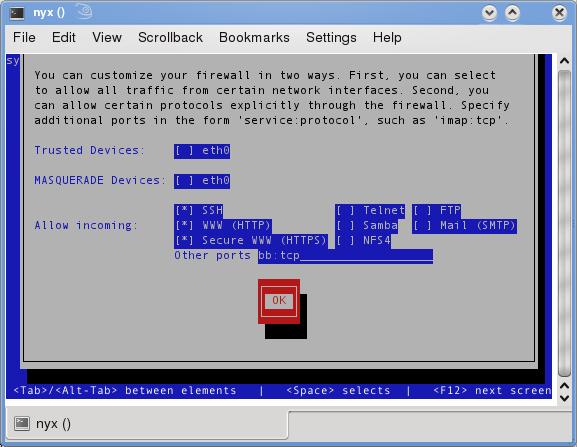
| callisto:~ # vi /etc/sysconfig/SuSEfirewall2 ... FW_SERVICES_EXT_TCP="ssh www" ... callisto:~ # rcSuSEfirewall2 restart Starting Firewall Initialization (phase 2 of 2) done callisto:~ # |
| callisto:~ # su - xymon -c '/opt/monitor/xymon/server/bin/hobbit.sh start' |
| callisto:/opt/monitor/xymon/server/etc
# cp xymon.opensuse11
/etc/init.d/xymon callisto:/opt/monitor/xymon/server/etc # cd /etc/init.d/ callisto:/etc/init.d # chmod a+x xymon callisto:/etc/init.d # chkconfig --add xymon xymon 0:off 1:off 2:off 3:on 4:off 5:on 6:off callisto:/etc/init.d # chkconfig --list xymon xymon 0:off 1:off 2:off 3:on 4:off 5:on 6:off callisto:/etc/init.d # service xymon start Starting xymon: Hobbit started Hobbit client for linux started on callisto callisto:/etc/init.d # |
| callisto:~ # wget
http://surfnet.dl.sourceforge.net/sourceforge/devmon/devmon-0.3.1-beta1.tar.gz --2009-03-18 13:48:24-- http://surfnet.dl.sourceforge.net/sourceforge/devmon/devmon-0.3.1-beta1.tar.gz Resolving surfnet.dl.sourceforge.net... 130.59.138.21, 2001:620:0:1b::21 Connecting to surfnet.dl.sourceforge.net|130.59.138.21|:80... connected. HTTP request sent, awaiting response... 200 OK Length: 105893 (103K) [application/x-gzip] Saving to: `devmon-0.3.1-beta1.tar.gz' 100%[=================================================================================================================================================================>] 105,893 533K/s in 0.2s 2009-03-18 13:48:24 (533 KB/s) - `devmon-0.3.1-beta1.tar.gz' saved [105893/105893] callisto:~ # wget http://surfnet.dl.sourceforge.net/sourceforge/devmon/devmon-templates-20080206.tar.gz --2009-03-18 13:48:32-- http://surfnet.dl.sourceforge.net/sourceforge/devmon/devmon-templates-20080206.tar.gz Resolving surfnet.dl.sourceforge.net... 130.59.138.21, 2001:620:0:1b::21 Connecting to surfnet.dl.sourceforge.net|130.59.138.21|:80... connected. HTTP request sent, awaiting response... 200 OK Length: 105617 (103K) [application/x-gzip] Saving to: `devmon-templates-20080206.tar.gz' 100%[=================================================================================================================================================================>] 105,617 542K/s in 0.2s 2009-03-18 13:48:33 (542 KB/s) - `devmon-templates-20080206.tar.gz' saved [105617/105617] callisto:~ # |
| callisto:/opt/monitor/devmon # zypper install net-snmp Loading repository data... Reading installed packages... Resolving package dependencies... The following NEW packages are going to be installed: net-snmp perl-SNMP Overall download size: 513.0 K. After the operation, additional 1.5 M will be used. Continue? [YES/no]: Retrieving package net-snmp-5.4.2.1-5.1.i586 (1/2), 351.0 K (953.0 K unpacked) Installing: net-snmp-5.4.2.1-5.1 [done] Retrieving package perl-SNMP-5.4.2.1-5.1.i586 (2/2), 162.0 K (626.0 K unpacked) Installing: perl-SNMP-5.4.2.1-5.1 [done] callisto:/opt/monitor/devmon # |
| callisto:~ # cd /opt/monitor/ callisto:/opt/monitor # tar xvzf ~/devmon-0.3.1-beta1.tar.gz devmon-0.3.1-beta1/ ... devmon-0.3.1-beta1/devmon.cfg callisto:/opt/monitor # ln -s devmon-0.3.1-beta1/ devmon [root@thebe devmon]# tar xvzf /root/devmon-templates-20080206.tar.gz devmon-templates-20080206/ ..... devmon-templates-20080206/pware-xups/README [root@thebe devmon]# ln -s devmon-templates-20080206/ templates |
| [root@thebe devmon]# vi devmon.cfg Edit de volgende parameter: BBHOSTS=/opt/monitor/xymon/server/etc/bb-hosts [root@thebe devmon]# cd modules/ [root@thebe devmon]# cp /usr/lib/mrtg2/BER.pm modules [root@thebe devmon]# cp /usr/lib/mrtg2/SNMP_Session.pm modules root@thebe devmon]# ./devmon --readbbhosts [root@thebe devmon]# ls -la total 80 drwxr-xr-x 6 501 501 4096 Oct 15 18:39 . drwxr-xr-x 4 root root 4096 Oct 14 22:32 .. ... -rw-r--r-- 1 root root 0 Oct 15 18:39 hosts.db ... [root@thebe devmon]# hosts.db is leeg, dus hij heeft niets gevonden. Opnieuw [root@thebe devmon]# vi /opt/monitor/xymon/server/bb-hosts ... 10.10.10.1 sw2950 # dialup http://sw2950/ telnet ssh DEVMON 10.10.10.2 router2600 # dialup DEVMON:cid(difficultpassword) ... (ze staan bij mij niet altijd aan, vandaar de dialup) [root@thebe devmon]# [root@thebe devmon]# ./devmon --readbbhosts [root@thebe devmon]# ls -l total 68 .... -rw-r--r-- 1 root root 55 Oct 15 18:44 hosts.db .... [root@thebe devmon]# [root@thebe devmon]# mv extras/devmon.initd.redhat /etc/init.d/devmon aanpassen met vi: [root@thebe devmon]# vi /etc/init.d/devmon ... prog="/opt/monitor/devmon/devmon" ... elif [ -e /opt/monitor/xymon/client/bin/bbcmd ] then prog="/opt/monitor/xymon/client/bin/bbcmd $prog" ... [root@thebe devmon]# service devmon start Starting Devmon: 2009-10-15 18:55:04 Using default environment file /opt/monitor/xymon/client/etc/hobbitclient.cfg [ OK ] [root@thebe devmon]# ps -ef | grep devm root 11016 8838 0 18:55 pts/0 00:00:00 grep devm [root@thebe devmon]# service devmon start Hee, geen devmon processen: Debugging: [root@thebe devmon]# cat /var/log/devmon.log [09-10-15@18:55:05] Cant write to pidfile /var/run/devmon/devmon.pid (No such file or directory) Ah.... [root@thebe devmon]# mkdir /var/run/devmon [root@thebe devmon]# cat /var/log/devmon.log [09-10-15@19:01:31] ---Initilizing devmon... [09-10-15@19:01:31] Node 0 reporting to 127.0.0.1 [09-10-15@19:01:31] Running under process id: 11325 [09-10-15@19:01:31] Entering poll loop [09-10-15@19:01:34] No SNMP data found for ifInDiscards on router2600 [09-10-15@19:01:34] No SNMP data found for ifOutOctets on router2600 ... [root@thebe devmon]# ps -ef | grep devmon root 11325 1 2 19:01 ? 00:00:01 devmon[master] root 11341 11325 0 19:01 ? 00:00:00 devmon root 11342 11325 0 19:01 ? 00:00:00 devmon root 11343 11325 0 19:01 ? 00:00:00 devmon root 11344 11325 0 19:01 ? 00:00:00 devmon root 11345 11325 0 19:01 ? 00:00:00 devmon root 11346 11325 0 19:01 ? 00:00:00 devmon root 11347 11325 0 19:01 ? 00:00:00 devmon root 11348 11325 0 19:01 ? 00:00:00 devmon root 11349 11325 0 19:01 ? 00:00:00 devmon root 11350 11325 0 19:01 ? 00:00:00 devmon root 11423 8838 0 19:02 pts/0 00:00:00 grep devmon [root@thebe devmon]# En dat ziet er ook een heel stuk beter uit. |
| callisto:/opt/monitor/devmon # snmpget -v2c -c HELLOWORLD sw2950
1.3.6.1.2.1.1.1.0 SNMPv2-MIB::sysDescr.0 = STRING: Cisco Internetwork Operating System Software IOS (tm) C2950 Software (C2950-I6Q4L2-M), Version 12.1(6)EA2a, RELEASE SOFTWARE (fc1) Copyright (c) 1986-2001 by cisco Systems, Inc. Compiled Thu 27-Dec-01 15:01 by antonino callisto:/opt/monitor/devmon # |